
How A&E Engineering Uses Serverless Technology to Host Online Machine Learning Models
September 28, 2022In the manufacturing domain, machine learning (ML) can have a big impact. Companies can produce better quality products and reduce throughput time by detecting machine anomalies, clustering failures to investigate patterns, and running predictive maintenance.
When data is coming in real-time, online machine learning methods can be used. This is a method in which the model is updated as soon as new data becomes available. This allows the model to learn incrementally, while also making a prediction for the new data point.
AWS partner A&E Engineering is using this concept as part of their efforts to support their clients’ industrial digital transformations. A&E Engineering is headquartered in Spartanburg, South Carolina. They are a traditional systems integration company, with a twist. A&E engineering has its own factory-to-cloud group, SkyIO. Through this partnership, A&E and SkyIO can execute projects that begin with electrical design and end with cloud-based ML solutions. Pretty cool, huh?
A&E Engineering worked closely with AWS Professional Services when they required a serverless online machine learning system. It was critical for A&E Engineering to use open source technologies like Python River and AWS Cloud Development Kit (AWS CDK) because this gives them a lower total cost of ownership (TCO) compared to closed source and proprietary alternatives. A second reason why open source is important to A&E Engineering is the fact that as new features become available they can adopt them quickly. The idea that A&E Engineering had was to develop a low-code solution based on open source libraries, that also does not need the introduction of too many additional AWS services. In the rest of this post, we will demonstrate their solution and show you how you can deploy a serverless online machine learning drift detection system with AWS Lambda using AWS CDK and the Python River software package.
Prerequisites
In order to deploy our solution successfully you will need:
- AWS account
- AWS CDK for Python installed
Architecture
In order to keep things simple and in a low-code fashion there’s only one AWS Lambda function for each ML model. This function contains, for example, a concept drift model that detects shifts in your data for a given signal.
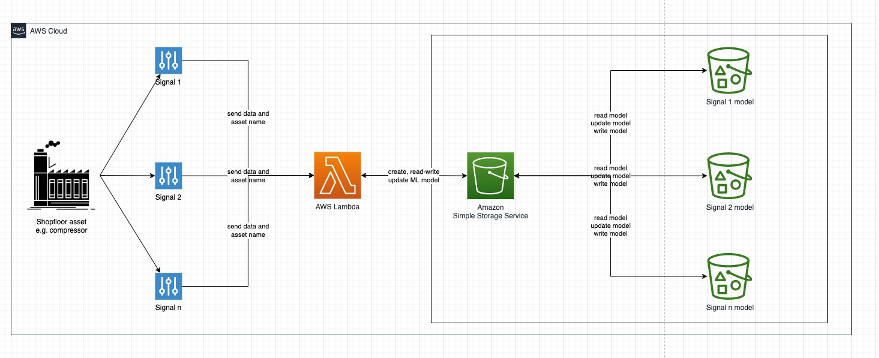
The flow of data is as follows:
- For each of your shopfloor assets, e.g. a compressor, you collect signals such as pressure, temperature, etc.
- One way of collecting this data from edge to cloud is AWS IoT Sitewise.
- Each signal is sent to a deployed AWS Lambda function that:
- checks if a model already exists on Amazon Simple Storage Service (Amazon S3)
- creates that model with the incoming data point if it doesn’t exist
- or reads, predicts and updates the model and then writes it back to Amazon S3.
- Each use case, signal and asset, e.g. anomaly detection for pressure of a compressor, has its own model saved to Amazon S3.
Online machine learning using the open source Python River package
Now that we understand the flow of data let’s discuss what online machine learning is and how it is done using the open source Python River package. As outlined on our AWS Well-Architected pages, the machine learning lifecycle has six building blocks:
- Business goal
- ML problem framing
- Data processing
- Model development
- Deployment
- Monitoring.

This process will repeat itself over time. When you use online machine learning this process does not change. However, the Deployment and Model Development stages merge slightly. In online ML the model updates itself as it sees new data. This means the model keeps updating itself over time, while it is already deployed.
A classic example for online ML is streaming data. In our context we look at streams from manufacturing equipment. As these machines produce new data points on a second level basis a model will predict and update itself at the same pace. A common use case in manufacturing is anomaly or drift detection. Engineers are interested in understanding when a machine signal starts drifting. Most often this will lead to a downtime or failure. Preventing this up front is a powerful cost saving approach.
Following the example from this documentation of the River Python package, you can see that a signal might drift over time. It can change its operating mean, the variance, or both.

Detecting concept drifts enables near real-time alerting. While new data is sent to the model it keeps learning new patterns. It also understands when a signal changes over time and adapts quickly. You can also see that the detection is only done after receiving a couple of new data points. This happens when the model realizes there was a drift and needs to adapt.
You will still need to monitor the model performance, but the advantage of this approach is that it updates itself. There’s no need to re-train the model, as it re-trained itself already.
Deploy the solution
In order to deploy the solution you will need to download this GitHub repository first. This is an AWS CDK stack that will deploy an AWS Lambda function together with an Amazon S3 bucket. The AWS Lambda function contains the model and Amazon S3 is used to save the model(s) created and used by Lambda.
Navigate into the downloaded repository — there you will find the following code structure:
lambda– this folder contains the code hosted in AWS Lambda. The code will be part of a Docker container that is deployed automatically, built and pushed to Amazon Elastic Container Registry (Amazon ECR) for you.river_app– this folder contains the implementation of the AWS CDK stack.tests– here you’ll find the unit tests that ensure your stack does what we intend it to doapp.py– the main entry file for AWS CDK to deploy your solutioncdk.json– the AWS CDK definition filerequirements.txt– a file pointing to setup.py to install all necessary packages to deploy your solutionsetup.py– the Python setup file that will ensure all dependencies for Python are installed.
Now that you know how this repository is structured, we can deploy the solution:
The cdk.json file tells the CDK Toolkit how to execute your application.
This project is set up like a standard Python project. We will need to create a virtual environment (virtualenv), stored under a .venv directory. To create the virtualenv it assumes that there is a python3 executable in your path with access to the venv package. But first, let’s install AWS CDK.
- Set the name of your stack and Amazon S3 bucket in py, e.g.:
RiverAppStack(app, "STACK_NAME", bucket_name='BUCKET_NAME')
- Install the AWS CDK using npm:
npm install -g aws-cdk
- Create a virtual environment on MacOS / Linux:
$ python3 -m venv .venv
- After the init process is complete and the virtual environment is created, you can use the following step to activate your virtual environment.
$ source .venv/bin/activate
- If you are on a Windows platform, activate the virtual environment with:
% .venv\Scripts\activate.bat
- Once the virtual environment is activated, install the required dependencies.
$ pip install -r requirements.txt
- Make sure that your account is bootstrapped:
$ cdk bootstrap
- You can now deploy the AWS CDK stack for this code, which will translate into an Amazon CloudFormation template and appear on the corresponding console.
$ cdk deploy
Optional: You can run unit tests that are included. These can be run through:
$ pytest
Congratulations! With these steps you have successfully deployed the solution.
Understanding the AWS Lambda function
The main part of the function is the part that either predicts and updates the model or creates the model. The function is built in a way that it checks if a model was already created and stored on Amazon S3. If it is, it will load the model object, update it and make a prediction.
If it was not yet created it initializes an empty model, learns from the first data point and then stores the object on Amazon S3.
# Initialize model - will be overwritten if
# it already exists in Amazon S3. If it doesn't
# this function will save a new empty model
# for you.
model = drift.ADWIN()
# Check if model exists...
try:
# Load the model from Amazon S3
logging.info("Load model...")
response = client.get_object(
Bucket=BUCKET,
Key=key)
r = BytesIO(response["Body"].read())
model = joblib.load(r)
# Update the model based on your newest observation
logging.info("Update model...")
model.update(val)
# If drift is detected change the output
logging.info("Detect changes...")
if model.drift_detected:
output_body["Drift"] = "Yes"
except botocore.exceptions.ClientError as e:
if e.response['Error']['Code'] == "404":
# Update the model based on your newest observation
logging.info("Update model...")
model.update(val)
logging.info("Object does not exist yet. Creating...")
else:
logging.error("The Lambda function failed for another reason...")
logging.error(e)
Another aspect we want to make you aware of is how this AWS Lambda function can be used for multiple signals from the same machine. The event that is passed to the AWS Lambda function will need at least two keys:
body: the value collected from the machine for a signalkey: the name of the signal or another unique identifier. This key will be used as the name of the object stored on Amazon S3. For instance, if you sendevent['key']equalscompressor1_pressure, then an object with that name will be created as your model and stored on Amazon S3. Alternatively, if an object with that name already exists it will be used to predict and then update itself.
val = float(event['body'])
key = event['key']
Adapt this template for other use cases
In this section we want to discuss how you can adapt the solution for other use cases or algorithms. Let’s assume we do not want to run drift detection but rather a clustering approach based on KMeans clustering. Following the documentation here our code will need to source the library first. So, add the following line to the top of the AWS Lambda function found under lambda/drift_detection/app.py
from river import cluster
Next, change the model in the code — instead of using the drift.ADWIN() method, change it to the following line:
model = cluster.KMeans(n_clusters=5)
This assumes that you expect the model to find at most five different clusters. If you now re-deploy the solution, you will have changed the AWS Lambda function from drift detection to clustering. Of course, you can also make use of AWS CDK and deploy multiple functions at the same time or you can deploy a separate stack for each functionality you want to implement.
Test your application
Once you’ve deployed your solution you will be able to test it. Navigate to the AWS Lambda console and click on the function with the name drift-detection-app-DriftDetection* that was deployed earlier. You can then test your AWS Lambda. An example test event can look like this:
{
"body": "42",
"key": "compressor1.pressure"
}
After clicking the Test button you will see an output similar to the message shown here, which states “Execution result: succeeded.”

Cleanup
If you are done testing, please make sure that you delete everything you deployed:
- Delete the Amazon ECR repository that was created during deployment.
- Delete the Amazon S3 bucket that was created.
- To delete the AWS CDK stack run the cdk destroycommand in the repository.
Conclusion
After following this blog post, you have successfully deployed an online serverless machine learning model using open source Python River and AWS Cloud Development Kit (AWS CDK). You also learned how to adapt the solution of anomaly detection to another machine learning algorithm.
