Create RESTful APIs on AWS with OpenAPI Specification (With No Coding)
June 6, 2023As businesses migrate from on premises to AWS, they want speed and agility when it comes to deploying and testing their workloads. AWS serverless technologies can vastly reduce the learning curve for their developers, making the transition to the cloud as smooth as possible.
Using AWS serverless technologies and the open source OpenAPI specification and the Swagger editor, a tool that implements the specification, allows us to rapidly define APIs and focus on the endpoints. In this blog we will get hands-on with the OpenAPI specification and see how we can utilize it for most API development.
Developing a RESTful API and hosting it on Amazon Web Services (AWS) can be a straightforward process. Serverless technologies allow you to skip the need to learn a new web development framework and provision, configure, and scale the servers that host the API. This leaves us with the following steps:
- Define our REST API contract.
- Write the code that handles the API requests.
- Set up a local developer environment to run and test the code.
- Deploy the solution to AWS.
If we choose to hard code API responses, we can skip steps two and three. This leaves us with steps one and four: Define your REST API contract and deploy it to AWS. The advantage of this approach is that you can complete both steps within minutes, and then demo the live API for your team.
If some of your teammates will consume your API, such as from a UI, they won’t have to wait for you to be done implementing the functionality before they can start testing it. Even though they’ll have just received hard coded responses, they will be able to write production-ready client code immediately. Let’s begin with an example API.
Defining our API contract
For this exercise, imagine you have some old sports equipment lying around that you would like to catalog and sell online. You will need API operations that allow you to create, read, update, and delete (CRUD) items from your catalog.
The following is a list of the specifications you will need to provide in order to create the API. Our sports equipment items will consist of the following data:
- ItemID: Assign an ID that uniquely identifies the item (for example, “1234″).
- Name: Create a human-friendly name for the item (for example, “basketball” or “baseball bat”).
- Condition: Specify the condition the item is in (for example, “new,” “lightly used,” or “worn-out”).
- Price: Specify the amount that you want to sell the item for (for example, “$5.00”).
Create the API contract using the OpenAPI specification and the Swagger editor. The OpenAPI specification lets you tell your REST API which requests are supported and what replies to expect. Some of the benefits of OpenAPI include integration with AWS services such as Amazon API Gateway, automatically generating documentation and tests, the ability to generate and test mock-APIs for all endpoints, and much more.
To define your API operations, you will articulate HTTP method usage, delineate request paths, and establish the expected inputs and outputs, including the data schema where applicable. Here are some specific things you will need to know:
- HTTP method, the map to CRUD (Create, Read, Update, Delete) operations
- POST: Use to create new resources
- GET: Use for read operations
- PUT: Use to update an existing resource
- DELETE: Use to delete resources
- Request path, for example, “/equipment” or “/equipment/itemID”
- This is the part of the API endpoint operation URL that comes after the domain.
- Expected input, such as request headers, query string parameters, and request path variables
- Expected output, such as response headers and HTTP response codes
- If we are receiving JSON in the request body or returning it in the response body, we’ll need to define a JSON schema to define the structure of the data
For the sports equipment catalog, use this OpenAPI specification, or create a visual representation of the schema by copying this specification and pasting it into the online Swagger editor. Another benefit of using an online editor is that it can confirm the validity of the specification.
In the previous specification, we defined the API CRUD operations in the “paths” section, and we defined the JSON schemas for the request/response bodies in the “components” section.
This blog won’t cover steps two and three where you write the code that handles the API requests or set up a local developer environment to run and test the code. This is because we will hard code the API responses. This way we can skip to step four, which is how to deploy the solution to AWS. For professional guidance on configuring API Gateway to manage backend APIs, we invite you to explore these tutorials.
Deploying the solution to AWS
For this article, we’ll focus on mocking up some API responses without using a programming language. Instead, we’ll add our mock behavior to a configuration file called an AWS Serverless Application Model (AWS SAM) template. Before we go further, let’s review some terminology and examine the process of creating a RESTful API on AWS.
- Serverless
- Technologies for running code, managing data, and integrating applications, all without managing servers.
- AWS SAM
- An open source framework for building serverless applications on AWS.
- AWS SAM template
- A shorthand YAML file to define AWS serverless resources, such as APIs, functions, databases, and event source mappings. This file defines your infrastructure as code.
- AWS Serverless Application Model Command Line Interface (AWS SAM CLI)
- A command line interface tool useful for building and deploying AWS serverless applications.
- Amazon API Gateway
- A fully managed service that makes it easy for developers to publish, maintain, monitor, and secure APIs with any business logic, or functionality from your back-end services. This includes applications that run on Amazon Elastic Compute Cloud (Amazon EC2), Amazon Elastic Container Service (Amazon ECS), or AWS Elastic Beanstalk, code that runs on AWS Lambda, or any web application. Amazon API Gateway handles all the tasks involved in accepting and processing up to hundreds of thousands of concurrent API calls, including traffic management, authorization and access control, monitoring, and API version management.
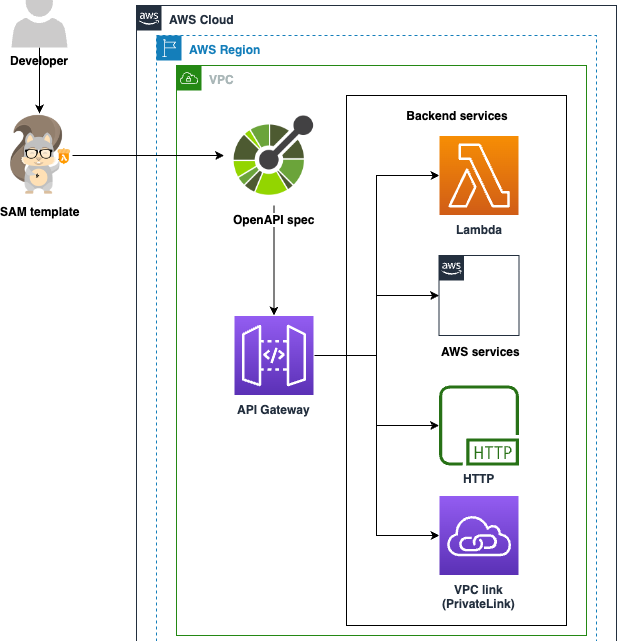
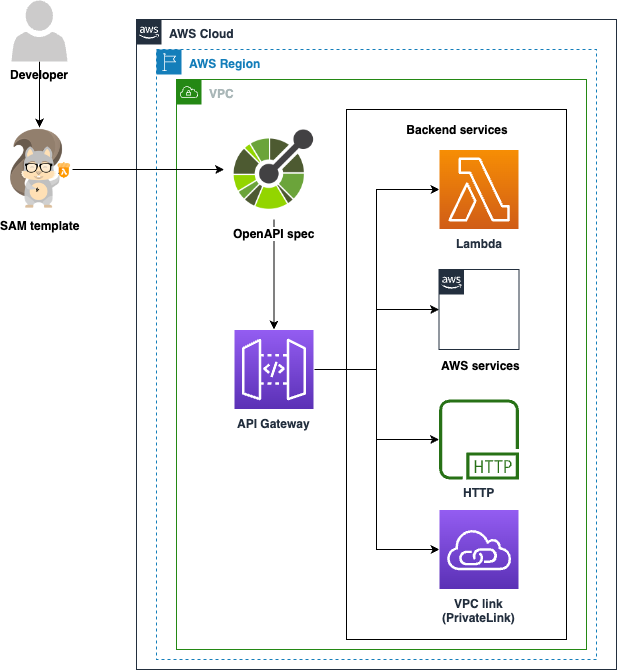
This diagram illustrates the process of creating a RESTful API on AWS using the OpenAPI specification without any coding. It also demonstrates how an OpenAPI spec file can be used by developers to define API configuration details such as paths, methods, schema, and responses, which will then be automatically translated into an API Gateway configuration.
Create a SAM template
Here is an AWS SAM template that partially configures an API Gateway and includes the OpenAPI specification. To follow along with this tutorial, create a directory on your computer to hold the project files from this blog. Create a file in that directory called template.yaml and paste this content into it:
Note: Indentation matters in YAML documents, so be careful when formatting the document.
Before you deploy the API Gateway to your AWS account, take steps to ensure that it is callable from only your IP address (or from a team member’s IP address). To do this, determine your computer’s IP address and replace the text myIpAddress in the template with your IP address. You can find your public IP address by navigating to a site like this.
In a real world situation, we would use other means to secure our API, such as making it accessible from within only an Amazon Virtual Private Cloud (Amazon VPC) in our AWS account, or by configuring it to validate an authorization token in the request. To find out more about how to protect your APIs, visit the API Gateway Developer Guide. For this blog example, restricting access with an IP allow list will suffice.
Finally, configure the API to return hardcoded responses to test it out. To do this, copy the following configurations and paste them immediately after the “responses” section of each API operation. There are four places to update this.
At this point, we have an AWS SAM template that sets up an API Gateway that is configured to implement our OpenAPI specification and return hardcoded responses. If you want to adapt this hardcoded response for the GET operation to actually return equipment items, replace the JSON in the “responseTemplates” section with the text here:
Deploy your API
To deploy this solution to an AWS account, use the AWS SAM CLI.
Here are the AWS SAM CLI prerequisites:
- Install AWS SAM CLI.
- Configure it with an AWS identity that has permissions to use API Gateway in the AWS account.
Once you have installed and configured the AWS SAM CLI, deploy your API from the command line by changing the current directory to where the AWS SAM template.yaml file is located. From there, execute the following command:
sam deploy --stack-name sports-equipment-api
At this point, you will see the API endpoint URL listed towards the bottom of the command’s output. It will look something like this: https://<api-id>execute-api.<region>.amazonaws.com/dev. Copy this URL, paste it into your browser, and add “/equipment” to the end of it. You should get a response from your API that shows the rubber basketball item we previously configured.
You may have seen sections in our AWS SAM template that begin with x-amazon-apigateway-request-validator. API Gateway can validate incoming requests based on the presence of required inputs and the structure of request bodies. We can demonstrate this functionality by making a valid POST request to create a new sports equipment item, and another POST where our item is missing certain required fields.
First, let’s simulate creating a new equipment item with the following curl command in your terminal. Note that you will need to update the endpoint URL to match your deployment.
If you run this command, you should see an HTTP 200 success code returned. Now remove the ID and name fields from our request body. API Gateway should detect that this is an invalid request, since our JSON schema requires the ID and name fields to be present.
An HTTP 400 response code should appear, which indicates that the request was invalid.
Conclusion
As businesses migrate from on premises to AWS, they want speed and agility when it comes to deploying and testing their workloads. AWS serverless technologies can vastly reduce the learning curve for their developers, making the transition to the cloud as smooth as possible.
Using AWS serverless technologies and the OpenAPI specification, we can rapidly define APIs and focus on the endpoints. With the AWS SAM, you provision your resources with reliable deployment capabilities, and with OpenAPI, you can indicate which requests are supported and what replies to anticipate.
