Announcing Snapchange: An Open Source KVM-backed Snapshot Fuzzing Framework
May 10, 2023Fuzz testing or fuzzing is a commonly used technique for discovering bugs in software, and is useful in many different domains. However, the task of configuring a target to be fuzzed can be a laborious one, often involving refactoring large code bases to enable fuzz testing.
Today we are happy to announce Snapchange, a new open source project to make snapshot-based fuzzing much easier. Snapchange enables a target binary to be fuzzed with minimal modifications, providing useful introspection that aids in fuzzing. Snapchange is a Rust framework for building fuzzers that replay physical memory snapshots in order to increase efficiency and reduce complexity in fuzzing many types of targets. Snapchange utilizes the features of the Linux kernel’s built-in virtual machine manager known as kernel virtual machine or KVM. While Snapchange is agnostic to the target operating system, the included snapshot mechanism focuses on Linux-based targets for gathering the necessary debug information.
Snapchange started as an experiment by the AWS Find and Fix (F2) open source security research team to explore the potential of using KVM in enabling snapshot fuzzing. Snapshot fuzzing is a growing area of interest and experimentation among security researchers. Snapchange has now grown into a project that aims to provide a friendly experience for researchers and developers to experiment with snapshot fuzzing. Snapchange is one of a number of tools and techniques used by the F2 team in its research efforts aimed at creating a secure and trustworthy open source supply chain for AWS and its customers. We have found it sufficiently useful that we are sharing it with the broader research community.
Snapchange is available today under the Apache License 2.0 via GitHub. AWS F2 team is actively supporting Snapchange and has plans for new features, but we hope to engage the security research community to produce a more richly-featured and robust tool over the longer term. We welcome pull requests on GitHub and look forward to discussions that help enable future research via the project. In this blog post we’ll walk through a set of tutorials you’ll find in the repository to help provide a deeper understanding of Snapchange.
Note: Snapchange operates within a Linux operating system but requires direct access to underlying KVM primitives. Thus, it is compatible with EC2 bare metal instance types, which run without a hypervisor, but not with EC2 virtualized instances. While we provide an EC2 AMI to make it easier to get started by launching on a bare metal instance (more information on that provided below), users are free to run Snapchange in other environments that meet the basic hardware requirements.
What is snapshot fuzzing?
Fuzzing uncovers software issues by monitoring how the system behaves while processing data, especially data provided as an input to the system. Fuzzing attempts to answer the question: What happens when the data is structured in a way that is outside the scope of what the software expects to receive? If the software is bug-free, there should be no input, no matter how inappropriate or corrupt, that causes it to crash. All input data should be properly validated and either pass validation and be used, or be rejected with a well-defined error result. Any input data that causes the software to crash shows a flaw and a potential weakness in the software. For example, fuzzing an application that renders JPEGs could involve mutating a sample JPEG file and opening the mutated JPEG in the application. If the application crashes or otherwise behaves in unexpected ways, this mutated file might have uncovered an issue.
The chosen mutations, however, are not truly random. We typically guide a fuzzer using “coverage” techniques. Coverage measures what code path an input from the fuzzer has caused to be executed in the target, and is used to automatically guide a fuzzer to modify its subsequent inputs so that the execution path in the target is changed to include previously-untested portions of the target’s code. Information about the sections of code in the target that were previously executed are cached in an input corpus, and that information is used to guide new inputs to explore additional code paths. In this way, variations on the same inputs will be applied in the expectation of discovering more previously untested code sections in the target, until all parts of the target code which can be reached by a possible execution path have been tested.
A snapshot is a pairing of a physical memory dump of a running VM and its accompanying register state. Fuzzing with a snapshot enables granular execution in order to reach code blocks that are traditionally difficult to fuzz without the complexities of managing state within the target. The only information needed by Snapchange in order to continue the execution of the target in a virtual machine is the snapshot itself. Prior work exploring this technique include brownie, falkervisor, chocolate_milk, Nyx, and what the fuzz. Most of these other tools require booting into a custom hypervisor on bare metal or with a modified KVM and kernel module. Snapchange can be used in environments where booting into a custom hypervisor isn’t straightforward. As noted, it can also be used on EC2 on bare metal instances that boot without any hypervisor at all.
How Snapchange Works
Snapchange fuzzes a target by injecting mutated data in the virtual machine and provides a breakpoint-based hooking mechanism, real-time coverage reports in a variety of formats (such as Lighthouse and LCOV), and single-step traces useful for debugging. With Snapchange, you can fuzz a given physical memory snapshot across multiple CPU cores in parallel, while monitoring for crashing states such as a segmentation fault or a call to an Address Sanitizer report.
While Snapchange doesn’t care how a snapshot is obtained, it includes one method which uses a patched QEMU instance via the included qemu_snapshot utility. This snapshot is then used as the initial state of a KVM virtual machine to fuzz a target.
The fuzzing loop starts by initializing the memory of a whole KVM virtual machine with the physical memory and register state of the snapshot. Snapchange then gives the user the ability to write a mutated input in the loaded guest’s memory. The virtual machine is then executed until a crash, timeout, or reset event occurs. At this point, the virtual machine will revert back to a clean state. The guest memory is restored to the original snapshot’s memory in preparation for the next input case. In order to avoid writing the entire snapshot memory on every reset, only pages that were modified during execution are restored. This significantly reduces the amount of memory which needs to be restored, speeding up the fuzzing cycle, and allowing more time to be spent fuzzing the target.
This ability to arbitrarily reset guest memory enables precise choices when harnessing a fuzz target. With snapshots, the harnessing effort involves discovering where in memory the relevant input resides. For example, instead of having to rewrite a networked application to take input packets from command line or stdin, we can use a debugger to break immediately after a recv call. Pausing execution at this point, we can document the buffer that was read into, for example address 0x6000_0000_0100 , and take a snapshot of the system with this memory address in mind. Once the snapshot is loaded via Snapchange, we can write a mutated input packet to address 0x6000_0000_0100 and continue executing the target as if it were a real packet. This precisely mimics what would happen if a corrupt or malicious packet was read off the network in a real-world scenario.
Experimenting with Snapchange
Snapchange, along with several example targets, can be found on GitHub. Because Snapchange relies on KVM for executing a snapshot, Snapchange must be used on a machine that has KVM access. Currently, Snapchange only supports x64 hosts and snapshots. As previously noted, Snapchange can be used in Amazon EC2 on a wide variety of .metal instances based on Intel processors, for example, a c6i.metal instance. There is also a public AMI containing Snapchange, with the examples pre-built and pre-snapshotted. The pre-built AMI is ami-008dec48252956ad5 in the US-East-2 region. For more information about using an AMI, check out the Get started with Amazon EC2 Linux instances tutorial. You can also install Snapchange in your own environment if you have access to supported hardware.
This blog will go over the first example in the Snapchange repository to demonstrate some of the features provided. For a more step-by-step walk-through, check out the full tutorial in the README for the 01_getpid example here.
Example target
We’ll start with the first example in Snapchange to demonstrate some of its features.
There are two goals for this target:
- The input
databuffer must solve for the stringfuzzmetosolveme! - The return value from
getpid()must be modified to be0xdeadbeef
When taking the snapshot, we logged that the input buffer being fuzzed is located at 0x555555556004.
It is the fuzzer’s job to write an input test case to address 0x5555_5555_6004 to begin fuzzing. Let’s look at how Snapchange handles coverage with breakpoints.
Coverage Breakpoints
Snapchange gathers its coverage of a target using breakpoints. In the snapshot directory, an optional .covbps file containing virtual addresses in the guest can be created. Because the snapshot is static, we can use hard coded memory addresses as part of the fuzzing process. During initialization, a breakpoint is inserted into the guest memory at every address found in the coverage breakpoint file. If any coverage breakpoint is hit, it means the current input executed a new piece of the target for the first time. The input is saved into the input corpus for future use and the breakpoint is removed. This removal of coverage breakpoints when they are encountered, means that the fuzzer only pays for the cost of the coverage breakpoint once.
One approach using these coverage breakpoints is to trigger on new basic blocks from the control flow graph of a target. There are a few utility scripts included in Snapchange to gather these basic blocks using Binary Ninja, Ghidra, and radare2.
The example coverage breakpoint file of the basic blocks found in example1.bin is in snapshot/example1.bin.covbps
Writing a fuzzer
To begin fuzzing with Snapchange, we can write the fuzzer specific for this target in Rust.
A few notes about this fuzzer:
- The fuzzer uses input of type
Vec<u8>([0]). This tells Snapchange to provide the default mutation strategies for a vector of bytes.- Note: This is an abstract type, so the fuzzer can provide a custom mutator/generator if they choose.
- The maximum length of a generated input will be 16 bytes (
[1]) - The fuzzer is passed a mutated
Vec<u8>inset_input. This input is then written to the address of the buffer logged during the snapshot (0x5555_5555_6004) via the call towrite_bytes_dirty([2]).- Note: This address is from the
printf("SNAPSHOT Data buffer: %p\n", data);line in the harness
- Note: This address is from the
- The fuzzer will apply, at most, two mutations per input case (
[3])
Snapchange provides an entry point to the main command-line utility that takes an abstract Fuzzer, like the one we have written. This will be the entry point for our fuzzer as well.
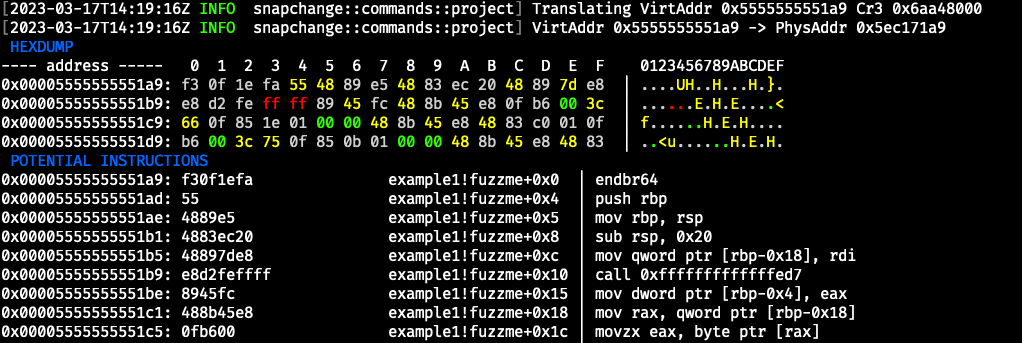
Building this we can verify that the project and snapshot directories are set up properly by attempting to translate the starting instruction pointer address from the snapshot. Snapchange provides a project translate command used for doing virtual to physical memory translations from the snapshot and attempting to disassemble the bytes found at the read physical address. We can disassemble from fuzzme function in the snapshot with the following:

With the confirmation that the project’s directory structure is set up properly, we can begin fuzzing!
Starting fuzzing!
Snapchange has a fuzz command which can execute across a configurable number of cores in parallel. To begin fuzzing, Snapchange will start a number of virtual machines with the physical memory found in the snapshot directory. Snapchange will then choose an input from the current corpus (or generate one if one doesn’t exist), mutate it with a variety of techniques, and then write it into the guest via the set_input() function we wrote. If any new coverage has been seen, the mutated input will be saved in the corpus for future use. If a crash is found, the crashing input will be saved for further analysis.
The example is looking for the password fuzzmetosolveme! by checking each byte in the input one at a time. This pattern creates a new location for coverage to find for each byte. If the mutation randomly finds the next byte in the password, that input is saved in the corpus to be used later to discover the next byte, until the entire password is uncovered.
We began fuzzing with 8 cores for this example.

The fuzz terminal user interface (TUI) is brought up with several pieces of information used to monitor the fuzzing:
- Execution time
- Basic core statistics for number of executions per second overall and per core
- Amount of coverage seen
- Number of crashes seen
- Average number of dirty pages needed to reset a guest
- Number of cores currently alive
- Basic coverage graph
The TUI also includes performance information about where time is being spent in the fuzzer as well as information about the reasons a virtual machine is exiting. This information is useful to have for understanding if the fuzzer is actually spending relevant time fuzzing or if the fuzzer is doing extraneous computation that is causing a performance degradation.

For example, this fuzz run is only spending 14% of the total execution time in the guest virtual machine fuzzing the target. For some targets, this could present an opportunity to improve the performance of the fuzzer. Ideally, we want the fuzzer to be working in the guest virtual machine as much as possible. This test case is so small, though, that this number is to be expected, but it is still useful to keep in mind for more complex targets.
Lastly, there is a running list of recently-hit coverage to present a quick glance at what the fuzzer has recently uncovered in the target.

When fuzzing, the current coverage state seen by the fuzzer is written to disk, in real time, in a variety of formats: raw addresses, module+offset for usage in tools like Lighthouse, and (if debug information is available) LCOV format used for graphically annotating source code with this coverage information. This allows the developer or researcher to review the coverage to understand what the fuzzer is actually accomplishing to help them iterate on the fuzzer for potentially better results.

LCOV coverage displayed mid-fuzz session

Coverage displayed using Lighthouse in Binary Ninja
After some time, the fuzzer finds the correct input string to solve the first part of the target. We can look at the current corpus of the fuzzer in ./snapshot/current_corpus.
Snapchange hooks
With the password discovered, the second half of the target revolves around getting getpid() to return an arbitrary value. This value isn’t expected to be returned from getpid(), but we can use Snapchange’s introspection features to force this result to happen. Snapchange includes breakpoint callbacks as a technique to introspect and modify the guest, such as by patching functions. Here is one example of forcing getpid() to always return the value 0xdeadbeef for our fuzzer.
The fuzzer sets a breakpoint on the address for the symbol libc.so.6!__GI___getpid. When the breakpoint is triggered, the bp_hook function is called with the guest virtual machine (fuzzvm) as an argument. The return value for the function is stored in register rax, so we can set the value of rax to 0xdeadbeef via fuzzvm.set_rax(0xdeadbeef) [0]. We want the function to immediately return and not continue executing getpid(), so we fake the returning of the function by calling fuzzvm.fake_immediate_return() [1] to set the instruction pointer to the value on the top of the stack and Continue execution of the guest at this point [2] (rather than forcing the guest to reset).
We aren’t restricted to user space breakpoints. We could also force getpid() to return 0xdeadbeef by patching the call in the kernel in __task_pid_nr_ns. At offset 0x83 in __task_pid_nr_ns, we patch the moment the PID is read from memory and returned to the user from the kernel.
With getpid patched, we can continue fuzzing the target and check the Crashes tab in the TUI.

This looks like we’ve detected a segmentation fault (SIGSEGV) for address 0xcafecafe from the bug found in the target:
Single Step Traces
With a crash in hand, Snapchange can give us a single step trace using the crash as an input.
This will give the state of the system at the time of the reset as well as the single step trace of the execution path. Notice that the guest reset on the force_sig_fault kernel function. This function is hooked by Snapchange to monitor for crashing states.

The single step trace is written to disk containing all instructions executed as well as the register state during each instruction. The trace includes:
- Decoded instruction
- State of the involved registers and memory for the given instruction
- Assembly bytes for the instruction (useful for patching)
- Source code where this assembly originated (if debug information is available)

What’s next for Snapchange?
The team is excited to hear from you and the community at large. We have ideas for more features and other analysis that can aid in fuzzing efforts and are interested in hearing what features the community is looking for in their fuzzing workflows. We’d also love feedback from you about your experience writing fuzzers using Snapchange on Snapchange’s GitHub. If this blog has sparked your curiosity, check out the other real-world examples included in the Snapchange repository.
