Deploying container application using Amazon CodeCatalyst and AWS App Runner
September 25, 2023Introduction
Amazon CodeCatalyst provides a collaboration space where developers easily build applications and streamline the deployment process. It integrates with container application services such as AWS App Runner, making containerized application deployments efficient and straightforward. Using CodeCatalyst’s native CI/CD workflow actions, development teams swiftly roll out applications and mitigate operational challenges. The workflow’s fluidity from coding to deploying ensures that developers move between stages effortlessly, promoting an agile development experience.
In this post, we’ll guide you through deploying a containerized application to App Runner using CodeCatalyst’s native CI/CD workflow actions for a seamless deployment experience.
Solution Overview
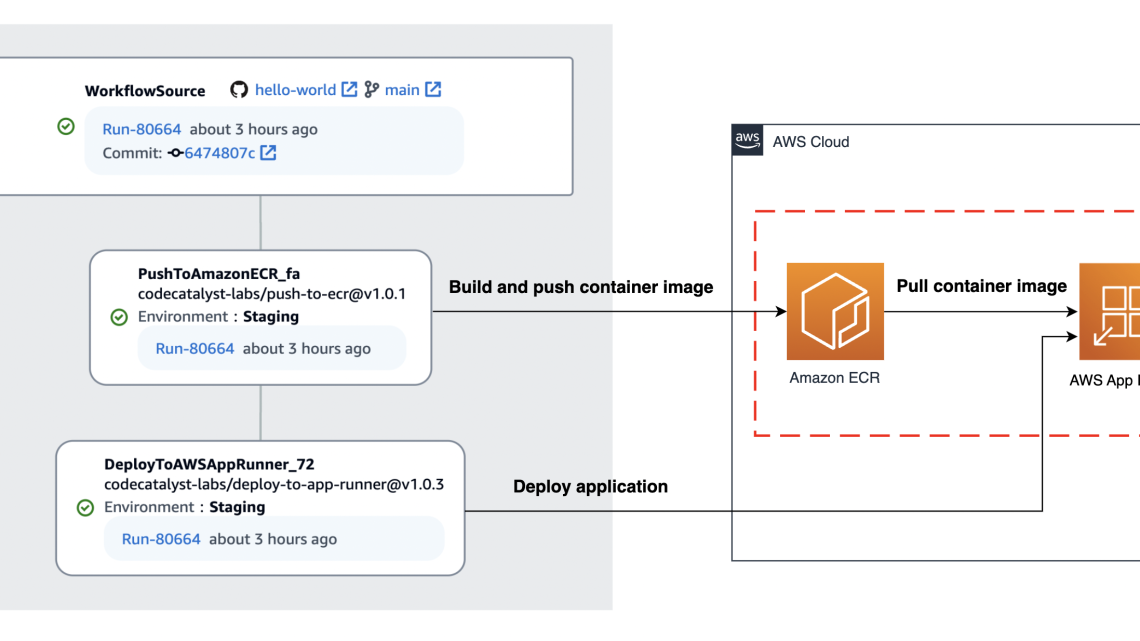
In this walkthrough, you will set up a basic “Hello World” static webpage using the Apache HTTP Server. The primary focus of this blog is to navigate the essential features of the CodeCatalyst workflow and its specific actions for App Runner service. Within this workflow, the “Push to Amazon ECR” action builds the container image and then pushes the image to Amazon Elastic Container Registry (ECR) . Subsequently, the “Deploy to AWS App Runner” action initiates an AWS CloudFormation template that launches the App Runner service.

Figure 1 – Solution Architecture
The solution described in the post covers the following steps:
- Create a sample application
- Set up CodeCatalyst environment
- Create a CodeCatalyst CI/CD workflow
Create a sample application
For this demonstration, GitHub serves as the source repository. Alternatively, you can create a source repository directly within CodeCatalyst or you can choose to link an existing source repository hosted by another service if that service is supported by an installed extension on CodeCatalyst.
The first step is to create a simple index.html file with the following content:
<html> <head> <title>Hello, World!</title> </head> <body> <h1>Hello, World!</h1> <p>Welcome to my demo of CodeCatalyst CI/CD Workflow. Watch how changes here magically appear live through the power of automation!</p> </body>
</html>
Next, create a Dockerfile in addition to the HTML file. This file contains two commands: the first instructs Docker to build an image from the httpd image, while the second places the index.html file into this image. Here’s a snippet of the Dockerfile:
FROM httpd
COPY ./index.html /usr/local/apache2/htdocs/
Once finalized, you can push these files to the GitHub repository. The following image displays the GitHub repository layout.

Figure 2 – GitHub repository layout
Set up CodeCatalyst environment
Follow these steps to set up the CodeCatalyst environment:
- Create a CodeCatalyst space and associated AWS account.
- Create a CodeCatalyst project.
- Link the GitHub repository to the CodeCatalyst project.
- Create a CodeCatalyst environment.
Create CodeCatalyst CI/CD workflow
To create a new workflow, select CI/CD from navigation on the left and then select Workflows. Then, select Create workflow, leave the default options, and select Create.

Figure 3 – Create CodeCatalyst workflow
If the workflow editor opens in YAML mode, select Visual to open the visual designer. Now, you can start adding actions to the workflow.
Step1: Add “Push to Amazon ECR” action
Add the “Push to Amazon ECR” action to the workflow as shown in Figure 4. Refer to adding an action to learn how to use the CodeCatalyst action.

Figure 4 – Add “Push to Amazon ECR” Action
Choose the Configuration tab and specify the configurations as shown in Figure 5.

Figure 5 – Configure “Push to Amazon ECR” action
Step 2: Add “Deploy to AWS App Runner” action
Add the “Deploy to AWS App Runner” action to the workflow for deploying the latest image in ECR to App Runner as shown in Figure 6. In the Inputs tab, under Depends on, choose the “PushToAmazonECR_xx” action.

Figure 6 – Add “Deploy to AWS App Runner” action
Choose the Configuration tab and specify the configurations of the App Runner action, as shown in Figure 7.
For Image Identifier, use the format “<account number>.dkr.ecr.<region>.amazonaws.com/<repository name>:<image tag>”, this will align with the ARN of the ECR image once the workflow generates it. For this guide, you are going to create a new App Runner service. When providing a Stack Name, the action determines whether the App Runner service is already exists. If not, it creates a new App Runner service using default configurations.

Figure 7 – Configure “Deploy to AWS App Runner” Action
You may notice that action does not support configuring all of the option available in App Runner. For those who find the options limiting, you can deploy your App Runner service manually through the AWS console or using Infrastructure-as-Code (IaC) methods. Once set up, you can simply use the ARN of your existing App Runner service in the action.
If you switch back to the YAML view, you can see that the following actions are added to the workflow definition.
Name: Workflow_371a
SchemaVersion: "1.0" Triggers:
- Type: Push Branches: - main Actions: PushToAmazonECR_fa: Identifier: codecatalyst-labs/[email protected] Environment: Connections: - Role: CodeCatalystWorkflowDevelopmentRole Name: "0123456789" Name: Staging Inputs: Sources: - WorkflowSource Type: EC2 Configuration: RepositoryName: hello-world AWSRegion: us-west-2 ImageTag: latest PublicRepository: false ImageScanningConfiguration: false DeployToAWSAppRunner_72: Identifier: codecatalyst-labs/[email protected] Environment: Connections: - Role: CodeCatalystWorkflowDevelopmentRole-mymymy Name: "0123456789" Name: Staging Compute: Type: EC2 Configuration: Tags: "[]" StackName: hello-world Wait: true AWSRegion: us-west-2 Port: 80 ImageIdentifier: 0123456789.dkr.ecr.us-west-2.amazonaws.com/hello-world:latest DependsOn: - PushToAmazonECR_fa
The workflow is now ready and you can validate it by choosing Validate. After that, save the changes by choosing Commit (Figure 8).

Figure 8 – Validate and commit workflow
When saving the workflow with commit, the workflow runs automatically. CodeCatalyst builds the container image of the application, pushes the image to ECR, and deploys the application to App Runner (Figure 9).

Figure 9 – Workflow run succeeded
Test the deployment
Once the “Deploy To AWS App Runner” action finishes, you can check the URL to the website of your service. To check the App Runner domain value, click on the Variables tab. Under Output variables, copy the value of the “AppUrl”.

Figure 10 – App Runner domain value
Visit the URL to verify the App Runner service is running.

Figure 11 – Verify the App Runner service is running
You can go ahead and test the CI/CD workflow by committing an update to theindex.htmlcontent in the source GitHub repo.
<html> <head> <title>Hello, Universe!</title> </head> <body> <h1>Hello, Universe!</h1> <p>Ta-da! Noticed that change? That's the magic of our CI/CD workflow in action with CodeCatalyst</p> </body>
</html>
Another workflow run starts automatically on a commit to source. When the workflow completes, refresh the browser tab to verify that the update is successful.

Figure 12 – Verify the App Runner service is updated
Cleanup
To avoid incurring extra charges after following this post’s workflow, consider cleaning up the resources that you set up.
1. Delete the ECR repository via AWS Management Console.
2. Delete the App Runner service by deleting the CloudFormation stack with the name identical to the “StackName” specified for the App Runner action.
3. Delete the CodeCatalyst workflow.
4. Delete the CodeCatalyst project by navigating to Project settings and choosing Delete project.
Conclusion
In summary, this post shows how to configure CodeCatalyst workflow to build and deploy containerized applications using CodeCatalyst’s native CI/CD workflow actions. By leveraging these actions, developers can simplify the deployment process to App Runner. Learn more and embark on your Amazon CodeCatalyst journey.
