Build and deploy to Amazon EKS with Amazon CodeCatalyst
October 2, 2023Amazon CodeCatalyst is an integrated service for software development teams adopting continuous integration and deployment (CI/CD) practices into their software development process. CodeCatalyst puts all of the tools that development teams need in one place, allowing for a unified experience for collaborating on, building, and releasing software. You can also integrate AWS resources with your projects by connecting your AWS accounts to your CodeCatalyst space. By managing all of the stages and aspects of your application lifecycle in one tool, you can deliver software quickly and confidently.
Introduction
Containerization has revolutionized the way we develop, deploy, and scale applications. With the rise of managed container services like Amazon Elastic Kubernetes Service (EKS), developers can leverage the power of Kubernetes without worrying about the underlying infrastructure. In this post, we will focus on how DevOps teams can use CodeCatalyst to build and deploy applications to EKS clusters.
CodeCatalyst offers a collection of pre-built actions that encapsulate common container-related tasks such as building and pushing a container image to an ECR and deploying a Kubernetes manifest. In this walkthrough, we will leverage two actions that can greatly simplify the container build and deployment process. We start by building a simple container image with the ‘Push to Amazon ECR’ action from CodeCatalyst labs. This action simplifies the process of building, tagging and pushing an image to an Amazon Elastic Container Registry (ECR). We will also utilize the ‘Deploy to Kubernetes cluster’ action from AWS for pushing our Kubernetes manifests with our updated image.

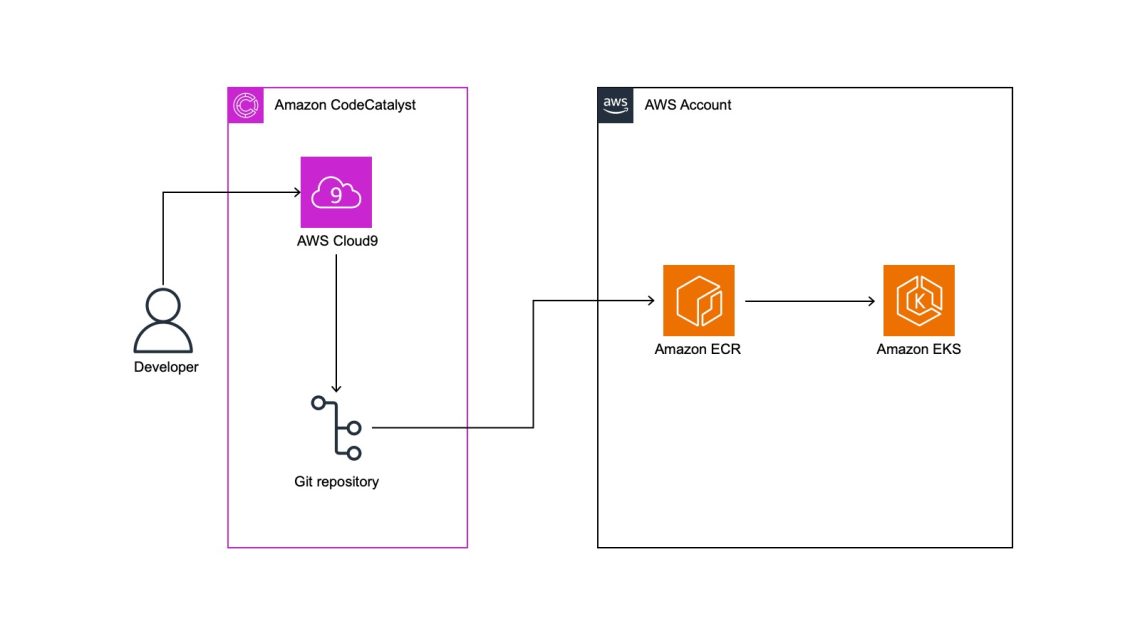
Figure 1: Architectural Diagram.
Prerequisites
To follow along with the post, you will need the following items:
- An AWS Builder ID for signing in to CodeCatalyst.
- A CodeCatalyst space
- Have the Space administrator role assigned in your CodeCatalyst space
- Have an AWS account associated with your space along with an associated IAM role
- A CodeCatalyst project with a source repository
- A CodeCatalyst environment configured with a connection to your target AWS account
- An Amazon EKS cluster and an Amazon ECR – we have called the ECR ‘demo-app’.
- The CodeCatalyst IAM role added to the aws-auth configMap for the EKS cluster
Walkthrough
In this walkthrough, we will build a simple Nginx based application and push this to an ECR, we will then build and deploy this image to an EKS cluster. The emphasis of this post, will be on how to translate a fairly common pattern with microservices applications to a CodeCatalyst workflow. At the end of the post, our workflow will look like so:

Figure 2: CodeCatalyst workflow.
Create the base workflow
To begin, we will create our workflow, in the CodeCatalyst project, Select CI/CD → Workflows → Create workflow:

Figure 3: Create workflow.
Leave the defaults for the Source Repository and Branch, select Create. We will have an empty workflow:

Figure 4: Empty workflow.
We can edit the workflow from within the CodeCatalyst console, or use a Dev Environment. We will create an initial commit of this workflow file, ignore any validation errors at this stage:

Figure 5: Creating Dev environment.
Connect to CodeCatalyst Dev Environment
For this post, we will use an AWS Cloud9 Dev Environment. Our first step is to connect to the Dev environment. Select Code → Dev Environments. If you do not already a Dev Instance, you can create an instance by selecting Create Dev Environment.

Figure 6: My Dev environment.
Create a CodeCatalyst secret
Prior to adding the code, we will add a CodeCatalyst secret that will be consumed by our workflow. Using CodeCatalyst secrets ensures that we do not store sensitive data in plaintext in our workflow file. To create the secrets in the CodeCatalyst console, browse to CICD -> Secrets. Select Create Secret with the following details:

Figure 7: Adding secrets.
Name: eks_cluster_name
Value: <Your EKS Cluster name>
Connect to the CodeCatalyst Dev Environment
We already have a Dev Environment so we will select Resume Instance. A new browser tab opens for the IDE and will be available in less than a minute. Once the IDE is ready, we can go ahead and start creating the Dockerfile and Kubernetes manifest that make up our application
The previous command block creates our Dockerfile, which we will build in our CodeCatalyst workflow from an Nginx base image and installs cURL. Next, we will add our Kubernetes manifest file to create a Kubernetes deployment and service for our application:
Create a directory called Manifests and a file inside the directory called demo-app.yaml. Update the file with code for deployment and Kubernetes Service.

Figure 8: demo-app.yaml file.
The previous code block shows the Kubernetes manifest file for our deployment, along with a Kubernetes service. We modify the image value to include the URI for our ECR as this value is unique. Once we have created our Dockerfile and Kubernetes manifest, pull the latest changes to our repository, including our workflow file that we just created. In our environment, our repository is called eks-demo-app:
We can now edit this file in our IDE. In our example our workflow is Workflow_df84 , we will locate Workflow_df84.yaml in the .codecatalyst\workflows directory in our repository. From here we can double click on the file to launch in the IDE for editing:

Figure 9: workflow file in yaml format.
Add the build steps to workflow
We can assign our workflow a name and configure the action for our build phase. The code outlined in the following diagram is our CodeCatalyst workflow definition

Figure 10: Workflow updated with build phase.
Kustomize starts from here

Figure 11: Workflow updated with Kustomize.
Deployment starts from here

Figure 12: Workflow updated with Deployment phase.
The workflow will now contain two CodeCatalyst actions – PushtoAmazonECR which builds and pushes our container image to the ECR. We have also added a dependent stage DeploytoKubernetesCluster which deploys our Kubernetes manifest.
To save our changes we select File -> Save, we can then commit these to our git repository by typing the following at the terminal:
The previous command will commit and push our changes the CodeCatalyst source repository, as we have a branch trigger for main defined, this will trigger a run of the workflow. We can monitor the status of the workflow in the CodeCatalyst console by selecting CICD -> Workflows. Locate your workflow and click on Runs to view the status.
We will now have all two stages available, as depicted at the beginning of this walkthrough. We will now have a container image in our ECR along with the newly built image deployed to our EKS cluster.
Cleaning up
If you have been following along with this workflow, you should delete the resources that you have deployed to avoid further changes. First, delete the Amazon ECR repository and Amazon EKS cluster (along with associated IAM roles) using the AWS console. Second, delete the CodeCatalyst project by navigating to project settings and choosing to Delete Project.
Conclusion
In this post, we explained how teams can easily get started building, scanning, and deploying a microservice application to an EKS cluster using CodeCatalyst. We outlined the stages in our workflow that enabled us to achieve the end-to-end build and release cycle. We also demonstrated how to enhance the developer experience of integrating CodeCatalyst with our Cloud9 Dev Environment.
Call to Action
Learn more about CodeCatalyst here.
